eWebinar Update: Salesforce Integration
Todd Parmley


A "webinar course" is typically a multi-webinar series with dedicated lessons to educate on a particular topic.
These differ from standalone webinars by offering a sequence of virtual lessons in a structured curriculum. Each session builds on the last — working together to cover a subject in depth, with interactive activities such as Q&As, polls, and quizzes.
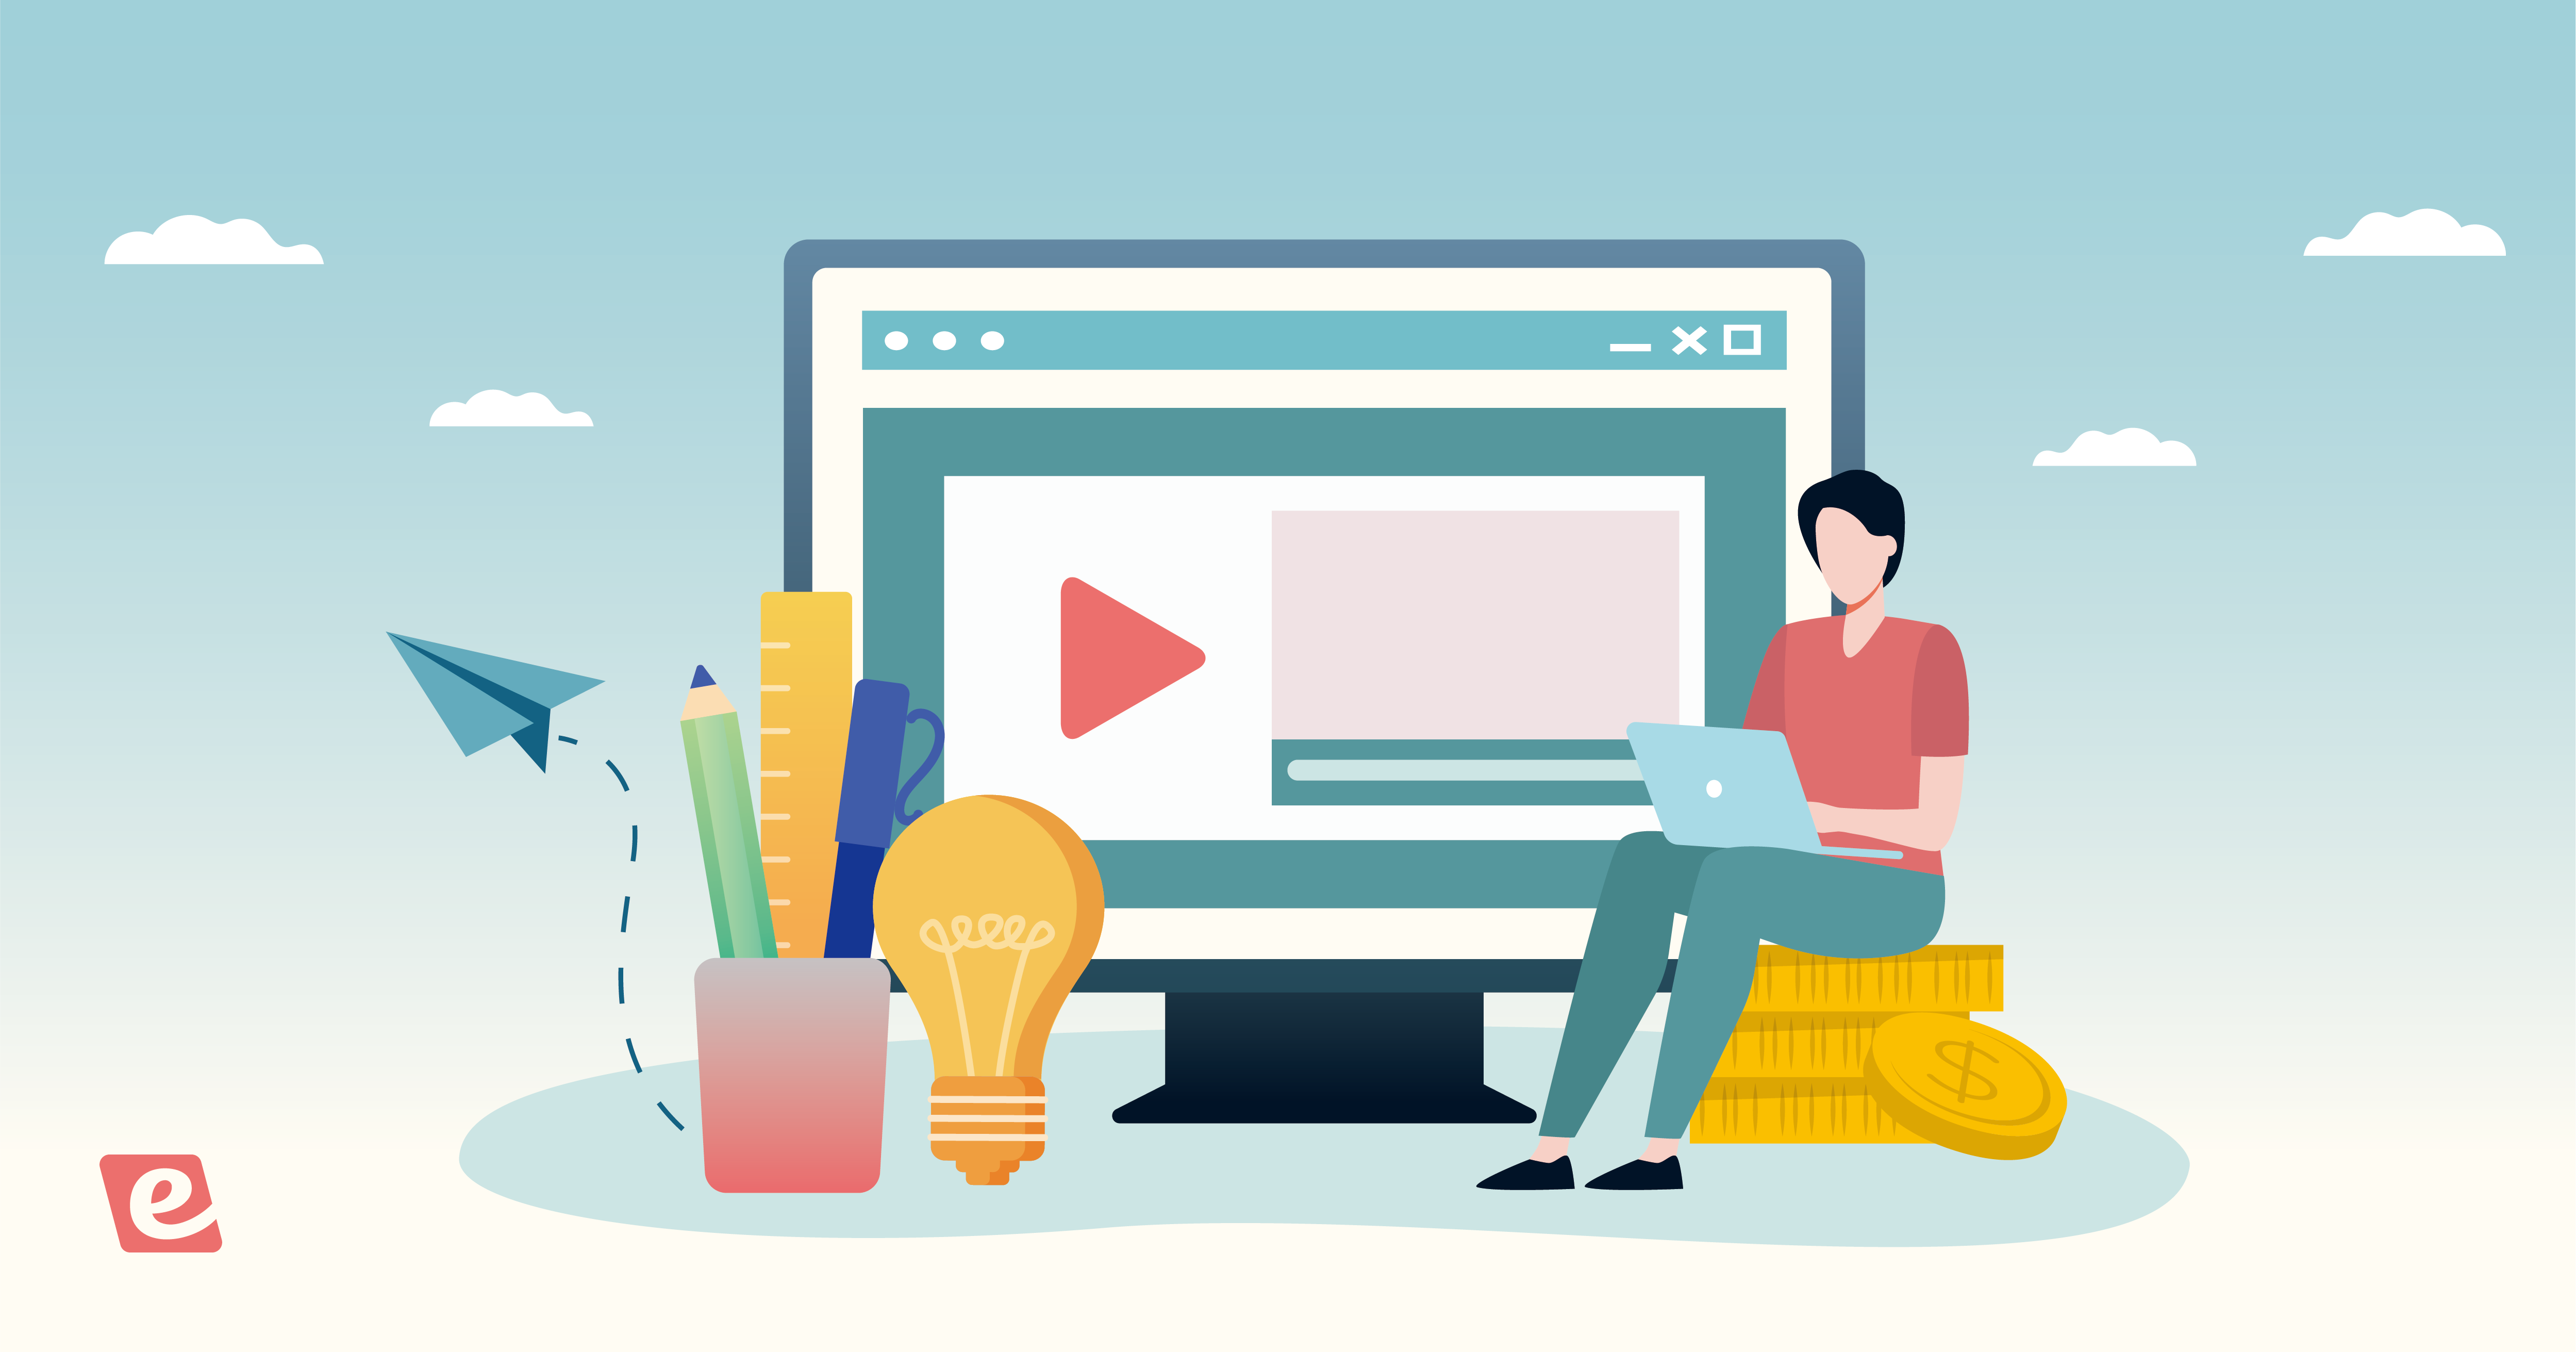
Webinar courses, by their nature, are meant to be held repeatedly for new audiences — they're evergreen assets you can use over and over again. Because of this, the best way to run these courses is with automated webinar software:
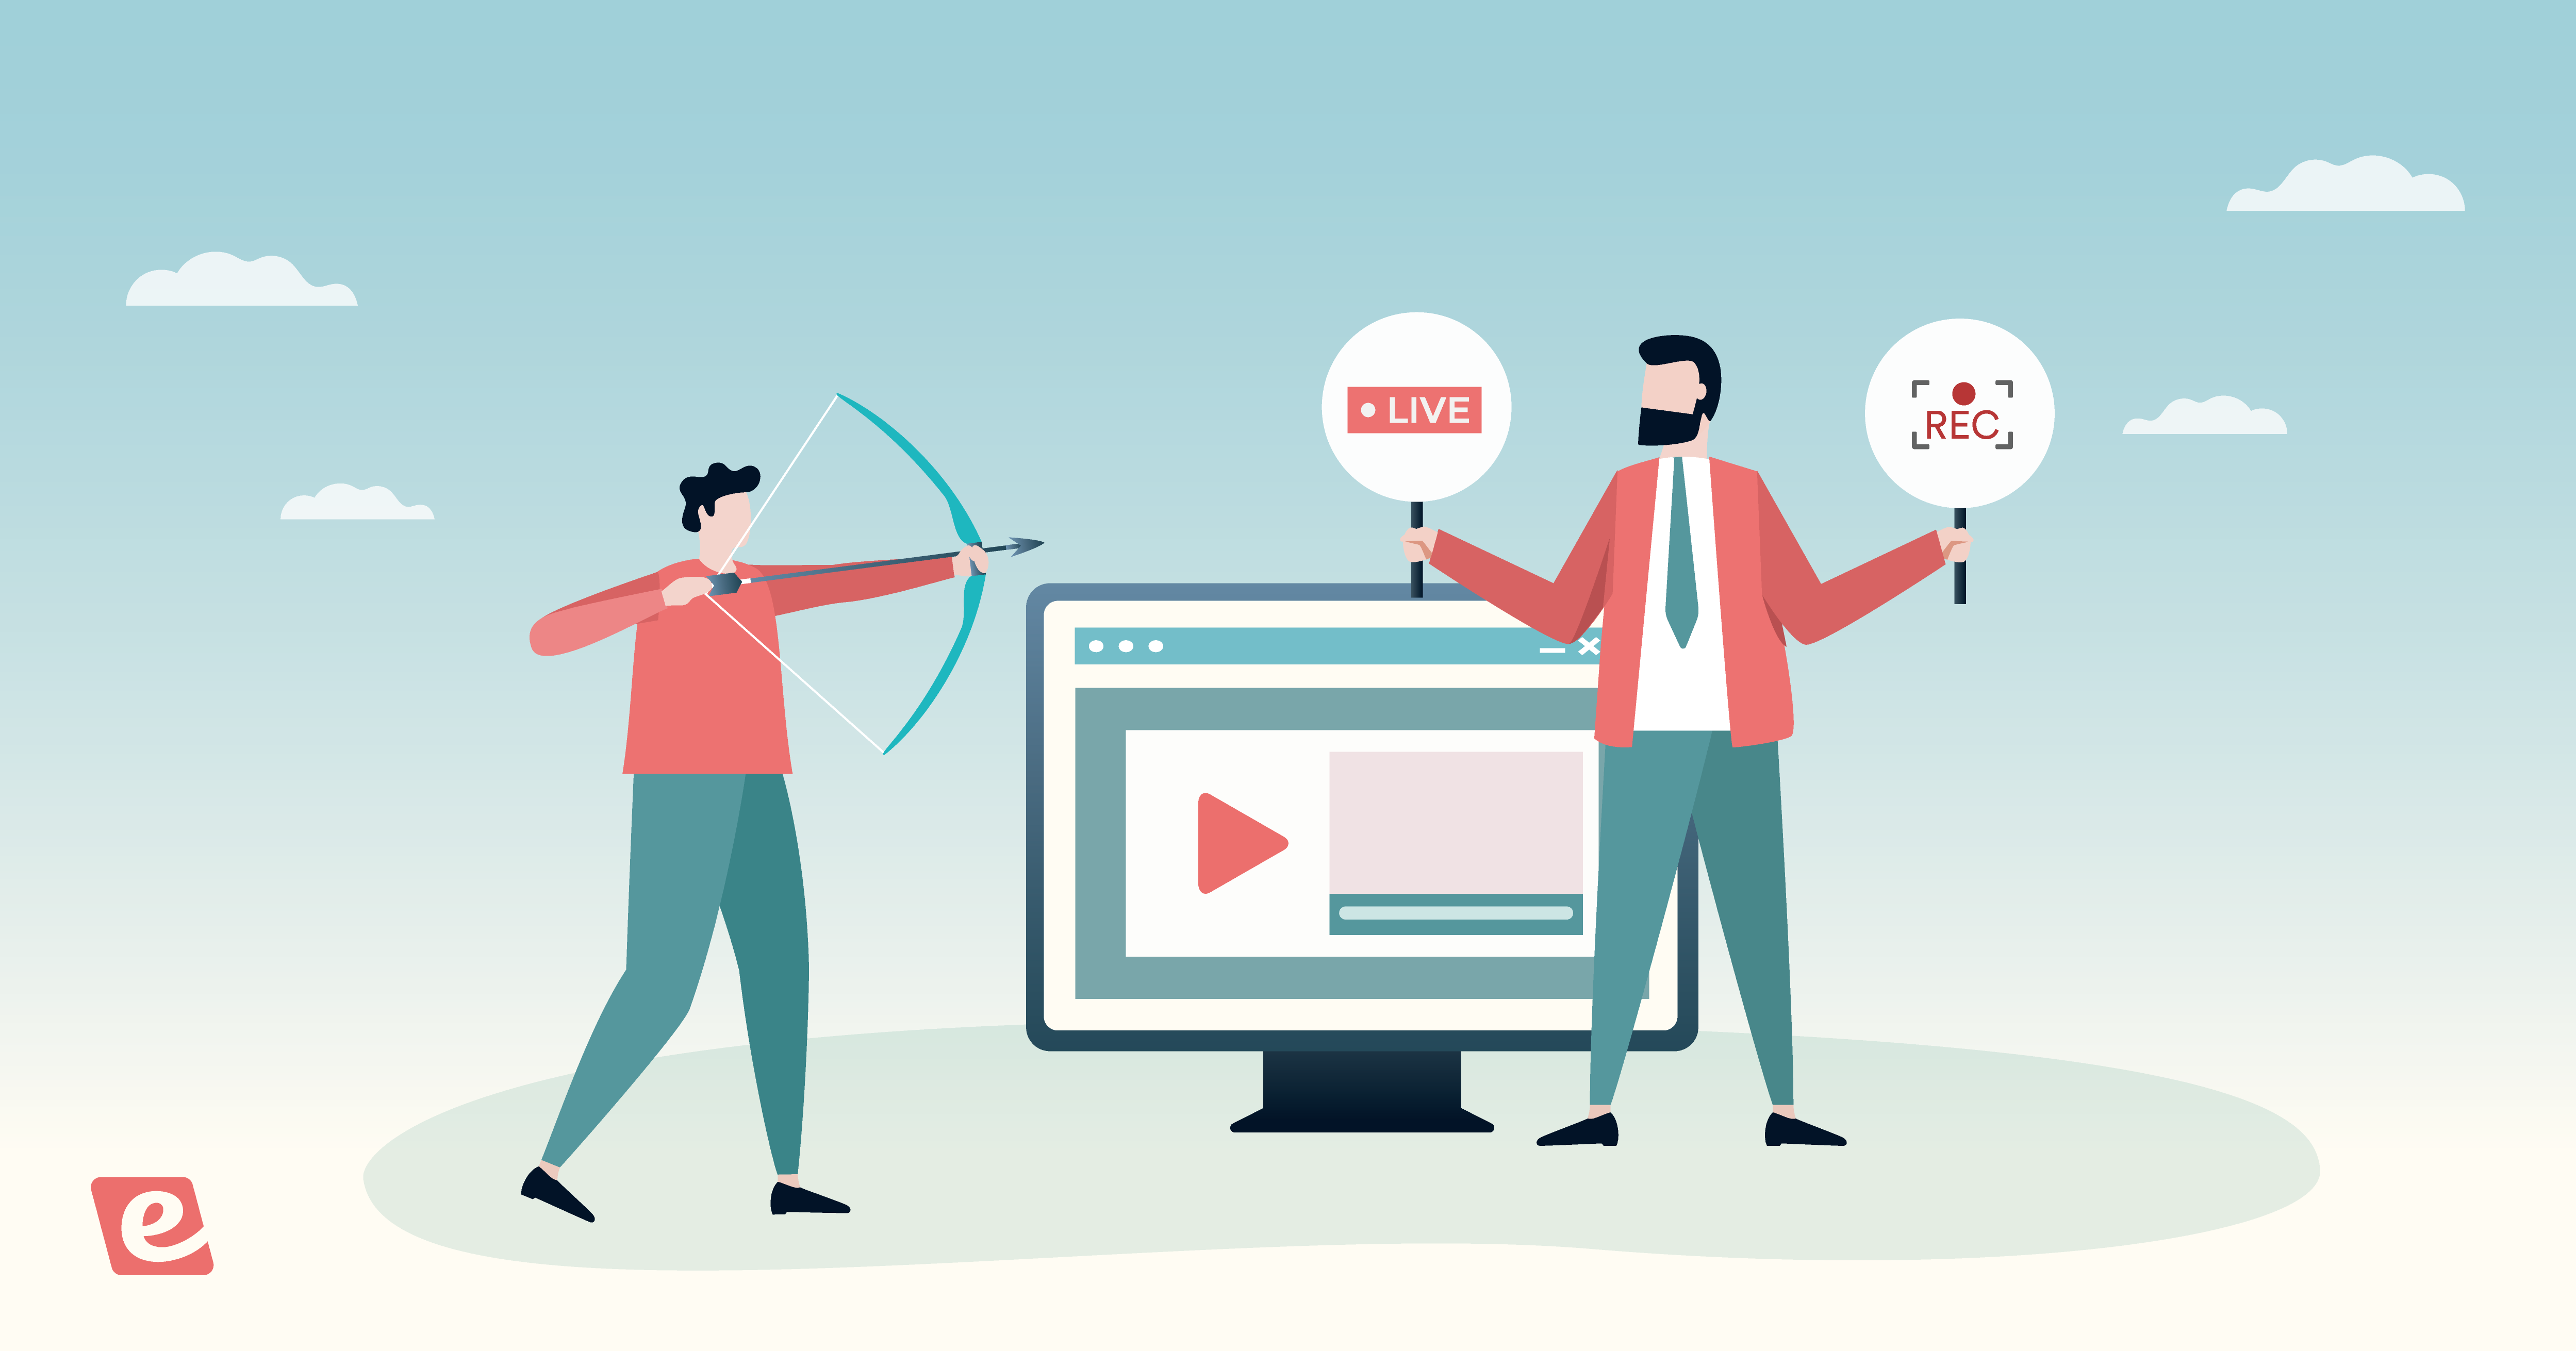
Automated webinars aren't plain old videos or some "fake live" webinar experience — they're pre-recorded webinars with built-in interactivity (including chat) that create the engaging, personal feel of a live event.
eWebinar is particularly well-suited for webinar courses because we're the only webinar software with a dedicated feature for this exact use case: Webinar Series.

Webinar Series lets you create a multi-webinar learning path, define its completion criteria (such as minimum watch times and quiz scores), offer personalized course pages for students to track their progress, and issue certificates to those who pass.
This step-by-step guide walks you through creating a webinar course and shows how Webinar Series supports you along the way.
If you’d like to learn more about Webinar Series after reading, you can start a 14-day free trial to explore the feature and begin building your first course.
First — and perhaps most obviously — choose your main overarching topic. It should be broad and multi-faceted enough to merit multiple lessons, particularly if those lessons build on one another to achieve a larger understanding.
Then, just as important as what you're teaching, you need to understand why you're teaching it. What is your main objective or goal? Clarify the desired outcome of your course before you start outlining content.
Do you want to…
Your goal shapes everything from the content itself to how you structure completion requirements.
Break your topic down into individual lessons that each cover a focused subtopic.
These lessons should build on each other sequentially, all feeding back to the main topic and driving the desired outcome. Make sure earlier lessons include everything critical to understanding later lessons. You want to create a clear path through the material where each session is digestible on its own, while contributing to the bigger picture.
You can think of it like chapters in a book: each needs to stand on its own while advancing the larger story.
Before you start creating content, you need to understand your target audience — who you're teaching — and their current knowledge level.
What do they already know about this topic? What are they struggling with? What do they need to learn to reach their goals?
You want to address the actual gaps in their knowledge and solve the real problems they're facing. The more you understand your audience, the more effective your course will be.
Now it's time to actually build out each lesson.
Start by creating an outline. Begin with your main topic, break it down into individual lessons, and then bullet out the main talking points for each one. Use this outline as your foundation for writing scripts.
After that, figure out which visuals you want to use in each lesson and create them. You'll want to design an interactive experience and plan activities during webinars, such as quizzes, polls, or Q&A prompts — these keep people engaged in each session and help reinforce learning.
Lastly, consider bringing in outside subject-matter experts to contribute to specific lessons.
In these cases, you’ll want to coordinate with guest speakers and discuss what you want them to pitch in on. You can give them key points to cover and let them fill in the script around those topics.
Then, you’ll also need to decide whether to record lessons together or if they’ll send recordings that you can screen-share during the lesson.
Before recording: rehearse, rehearse, rehearse! The more comfortable you are with your material, the more natural and engaging you'll sound on camera.
|
Pro tip: Host your course live before automating it. This gives you a chance to get real-time feedback, hold Q&A sessions to uncover what webinar attendees have more questions about, and see what's working (or not) with your content. You need to make sure your course can stand on its own, so you’re not constantly inundated with questions or discovering that students aren’t prepared for later lessons because essential content was missing from an earlier unit. Once you have fine-tuned your course lessons, you can record them or repurpose the recordings of your live sessions. |
We also cannot stress enough the importance of investing in (or even renting!) quality equipment. You need a good microphone and camera. Even if you plan the best content and know it like the back of your hand, poor audio quality can quickly lose attendees and detract from the overall experience.
Of course, lighting also matters. Natural light works great, but if that's not an option, a simple ring light can make a huge difference.
Before recording, do a quick dry run to test your webcam, microphone, and lighting, and ensure everything looks and sounds good. Then you can get rolling.
You can read more about the best practices and equipment for recording webinars in the additional resources below:
Upload each recording as a new webinar to your platform. (We’ll cover this in more detail below.)
Interactions are what make an automated webinar a true, engaging webinar experience (vs. passively watching a recorded video). You can add a variety of interactions within your webinar course to keep participants’ interest and test their knowledge throughout lessons.
We suggest adding:
Decide what participants need to do to move through your course.
You can:
Set minimum watch times to ensure people aren't just skipping through content
Include mandatory quizzes or action items that attendees must complete before they can access the next lesson
Set quiz requirements — such as requiring attendees to achieve a particular score to pass and move forward (which can be especially useful for certification training)
Completion controls ensure people are actually learning and absorbing the course material rather than just clicking through sessions to get a certificate at the end.
Create a single registration page for your course that lets users register once and gain access to all lessons in the series. That part is key. Having a single registration page that provides access to your full course eliminates the hassle of multiple webinar registration forms and keeps the experience simple and organized for participants.
Once your page is live, you can invite users from your email lists, add the registration link to your website, or link the course directly within your software product (for example, if you’re offering training or educational courses on how to use a particular system).
A significant benefit of using automated webinar software to run your courses is the ability to gather detailed analytics on how participants move through the learning path.
Track metrics like:
This data tells you whether your course is effective — are people actually learning, completing the material, and passing? Or do you need to fine-tune content by reworking specific lessons?
This data takes the guesswork out of gauging your course’s success rate and shows you exactly where you need to improve content to offer the best, most helpful learning experience.
Our Webinar Series is the best solution for offering webinar courses because it was built for this exact use case.
We created this tool because our users wanted to offer multi-webinar learning experiences they could deliver on demand and reuse with new audiences.
But the big thing our users stressed was that they also needed ways to control these experiences — to set completion requirements, monitor participant journeys, answer questions, and have real conversations with attendees as they moved through the course. They didn’t want to just string together a bunch of webinars.
Just as importantly, they wanted ways to simplify the experience for participants. Instead of making attendees juggle a dozen and one webinar links, figure out where they left off, and submit questions via email, they wanted to provide a central hub to support their learning journey.
However, none of the existing webinar software offered anything like this. They let you create registration pages that include multiple webinar sessions — but that’s it. There’s zero control for webinar providers after users register. And users have to manage their own learning experience.
Webinar Series was designed to address these issues and support both sides: webinar providers and course attendees.
And we’re still the only webinar platform with a dedicated feature like this.
Here’s how it works.
Start by pulling in all the webinars you want to include in your course. You can manually select each one, or use tags to pull in all webinars with a particular tag automatically.
Pro Tip: We suggest creating course-specific tags and tagging webinars as you upload. For example, if you’re creating courses on digital marketing strategies, you might tag lessons with "SEO," “content marketing,” "social media," or even "marketing fundamentals.” Tagging streamlines the process of grouping lessons — especially if you're managing multiple courses at once.
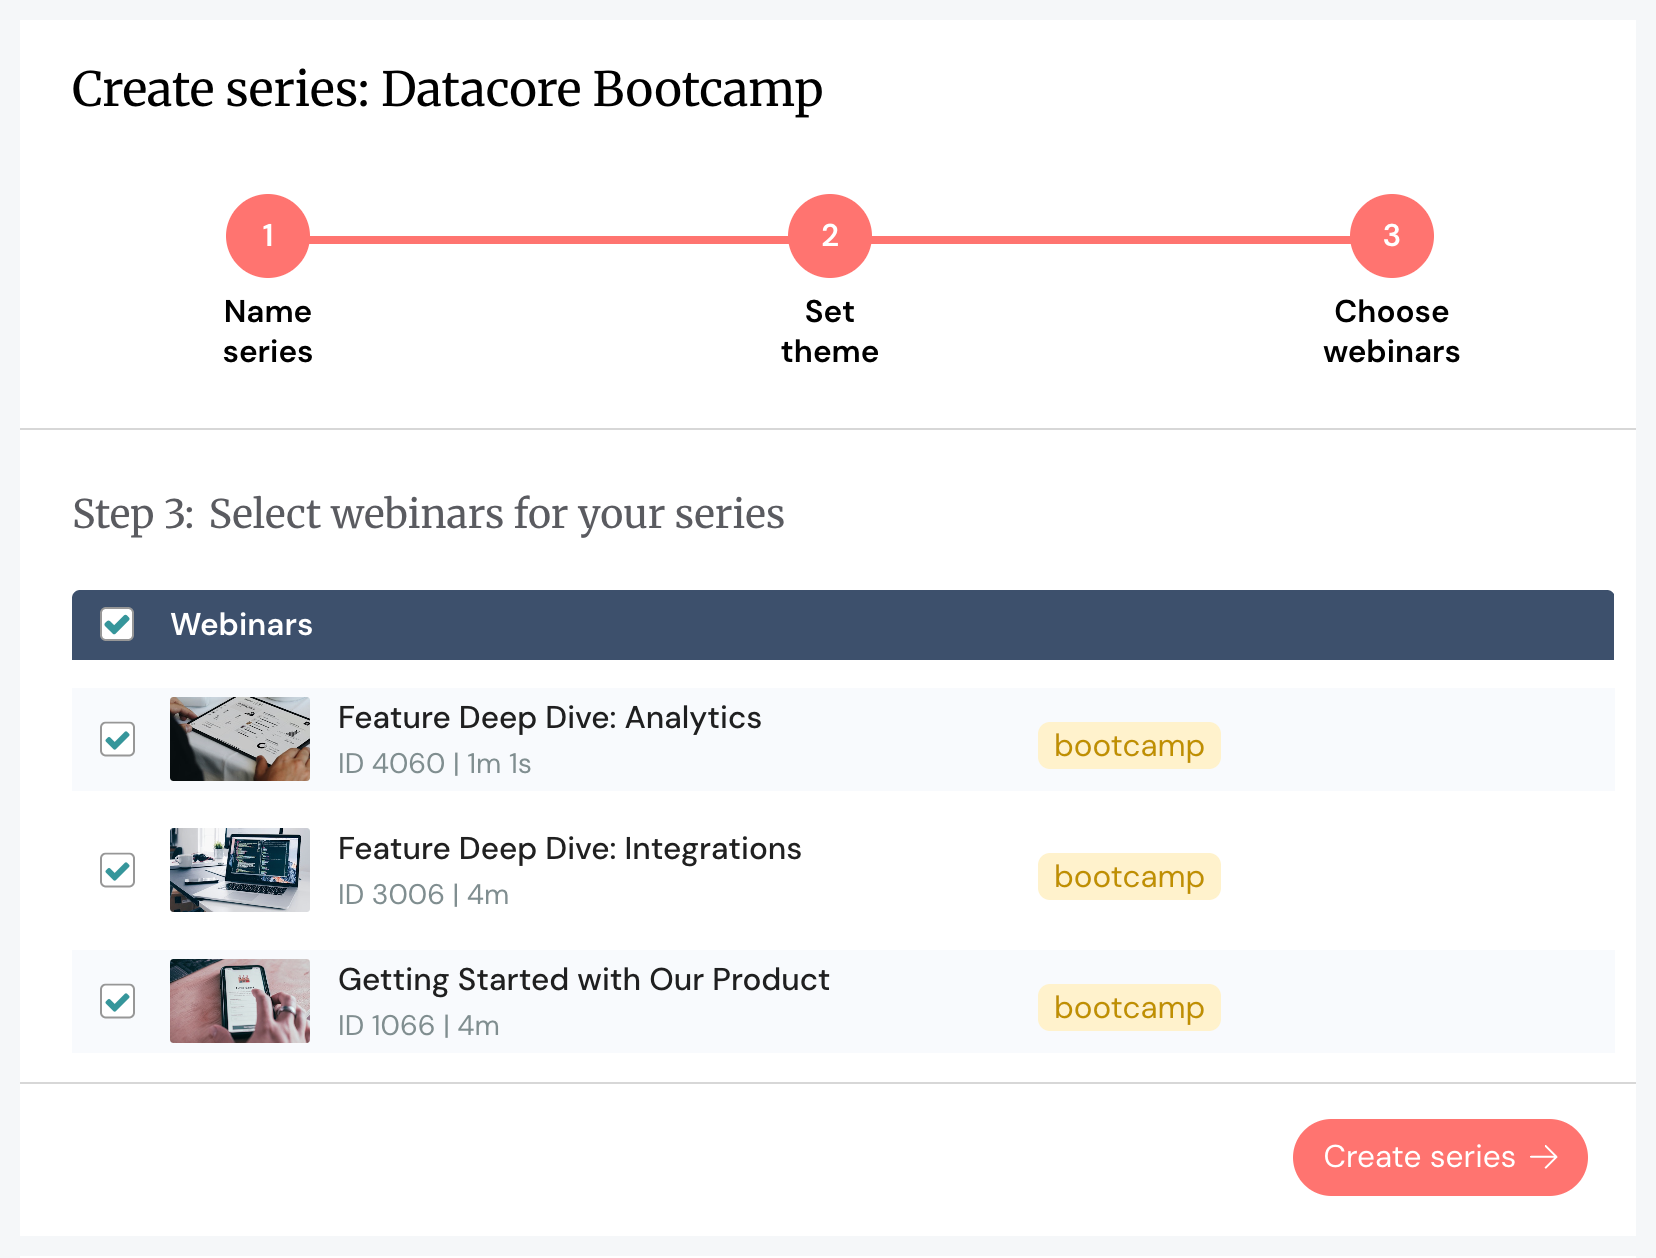
Then you can double-check that webinars are arranged in the order you intended when you designed your learning experience (and move them around as needed).
|
Re: #6 — Uploading your webinar recordings For each webinar, you’ll:
We even provide templates here to help you hit the ground running. |
There are two types of controls you’ll set here.
At the Series level, you’ll specify whether users must complete webinars in order or if they can jump around lessons, choosing what they want to tackle when. (Even if you want to let users skip around, you can still build your course in a prescribed order that guides them through the planned learning path.) You’ll also specify if users need to complete all webinars (recommended) or just a select few.
At the webinar level, you’ll specify what individuals need to do to advance from one webinar to the next. You can set mandatory watch times, quizzes, or action items. You can also set quiz requirements so users must achieve a certain grade to move forward.
We recommend setting at least one gated control between lessons because these are what prevent users from mindlessly skipping through the course.
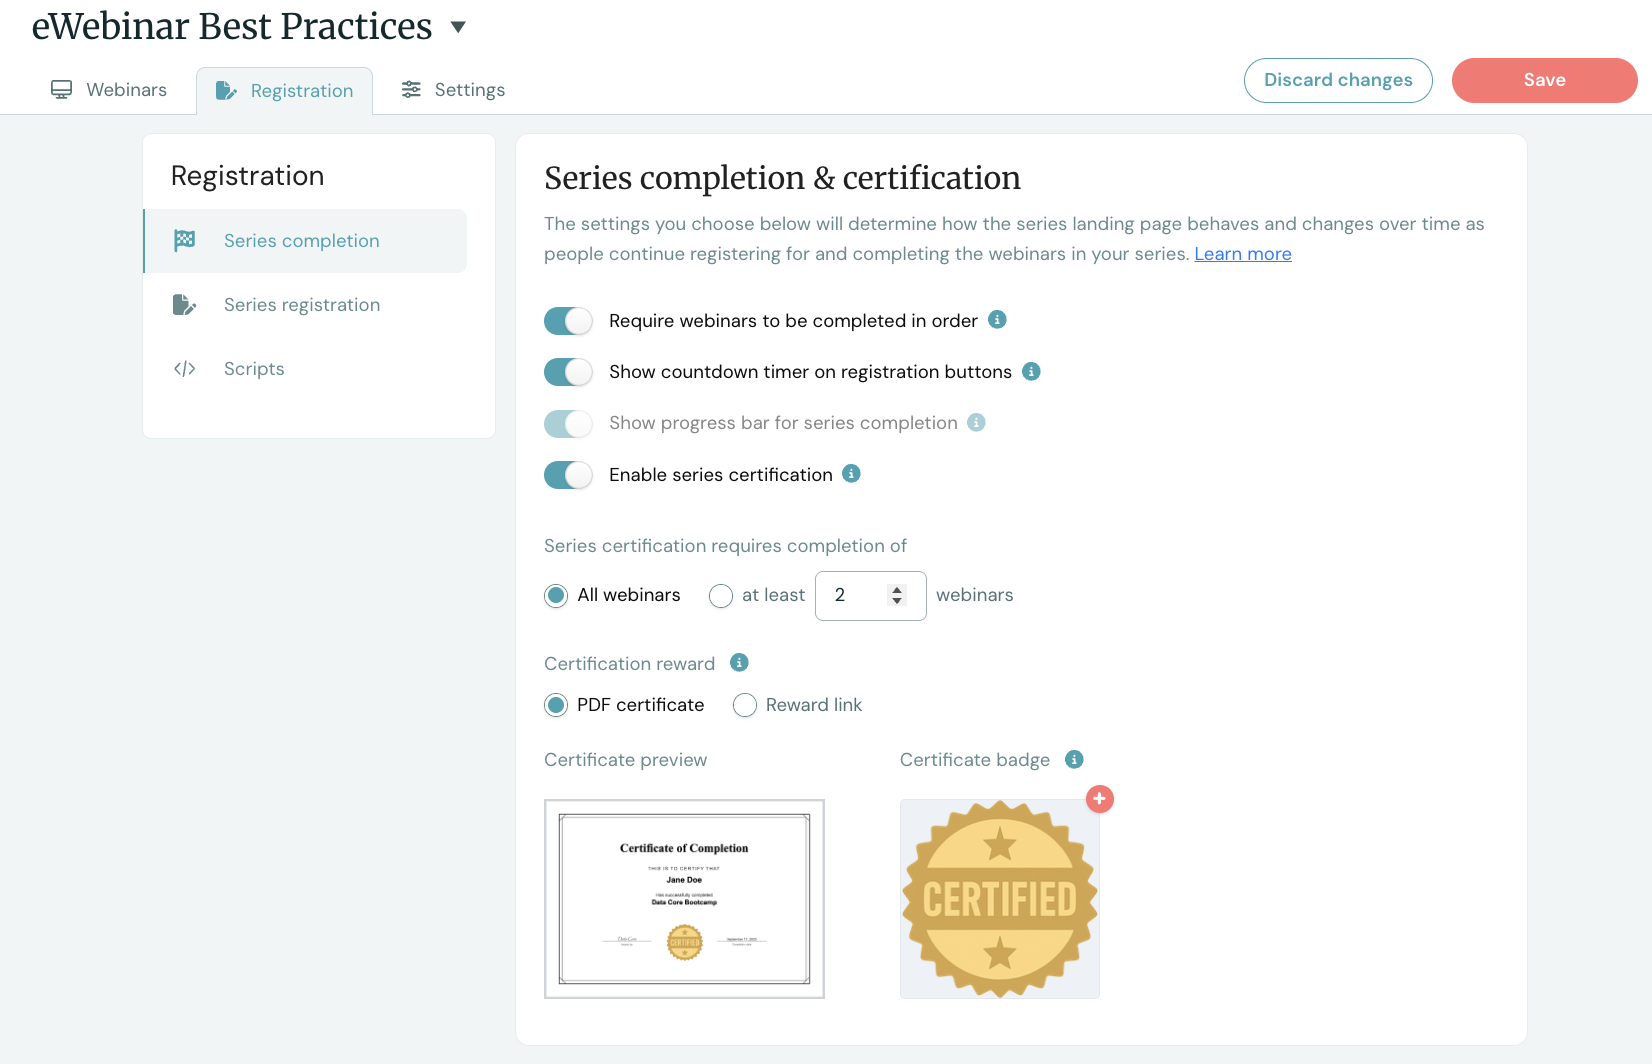
The Webinar Series feature includes simple completion certificates; you can add your branding to give them a more personal touch.
But if you want something more robust, you can integrate with Certifier. (Certifier lets you design professional certificates and badges any way you wish.)
In addition to completion certificates, eWebinar also makes it possible to offer rewards such as gift cards, discount codes, and other incentives by surfacing a rewards link.
Certificates and rewards gamify the experience and give attendees extra motivation to complete the course — they can even introduce a sense of competitiveness and create FOMO among users who haven’t crossed the finish line.
Next, you’ll specify how and when lessons are available — setting lesson schedules at the webinar level.
In most cases, you’ll want to set on-demand access so people can jump into lessons at any time and learn at their own pace.
However, we also offer just-in-time viewing (so lessons start within the next 5 minutes) and recurring schedules (so lessons run on certain days at certain times, like every Tuesday, Wednesday, and Thursday at 11 a.m., 2 p.m., and 6 p.m.).

You can use a combination of scheduling options and give attendees multiple ways to tune in: they can join on-demand webinars, start a session in a few minutes, or register for a specific time slot.
Pro Tip: When setting a recurring schedule, select “Attendee’s local time zone” so webinars always run at users’ local times. So if you set your webinar schedule for 11 a.m., 2 p.m., and 6 p.m., it’ll run at those times for all registrants, no matter their time zone.
Our platform makes this step incredibly easy — it can automatically generate copy for your landing page that clearly explains what registrants will learn and why they should sign up (based on your webinar transcript). You can edit the copy if you wish, or use the page as is.

Once your registration page is live, you can promote it however makes sense for your audience — share it via email, add it to your website, or link it directly in your product.
Of course, as we stressed above, our registration pages are configured so that users only need to register once to access the entire course.
After users register, they're automatically directed to their personalized training page, where they can access all lessons and track their progress. (More on this below!)
Note: After your course launches, you can send reminder emails to registrants to keep momentum going, or follow-up emails to those who complete sessions to promote new courses.
eWebinar supports attendee experiences by providing every user a personalized training page where they can:
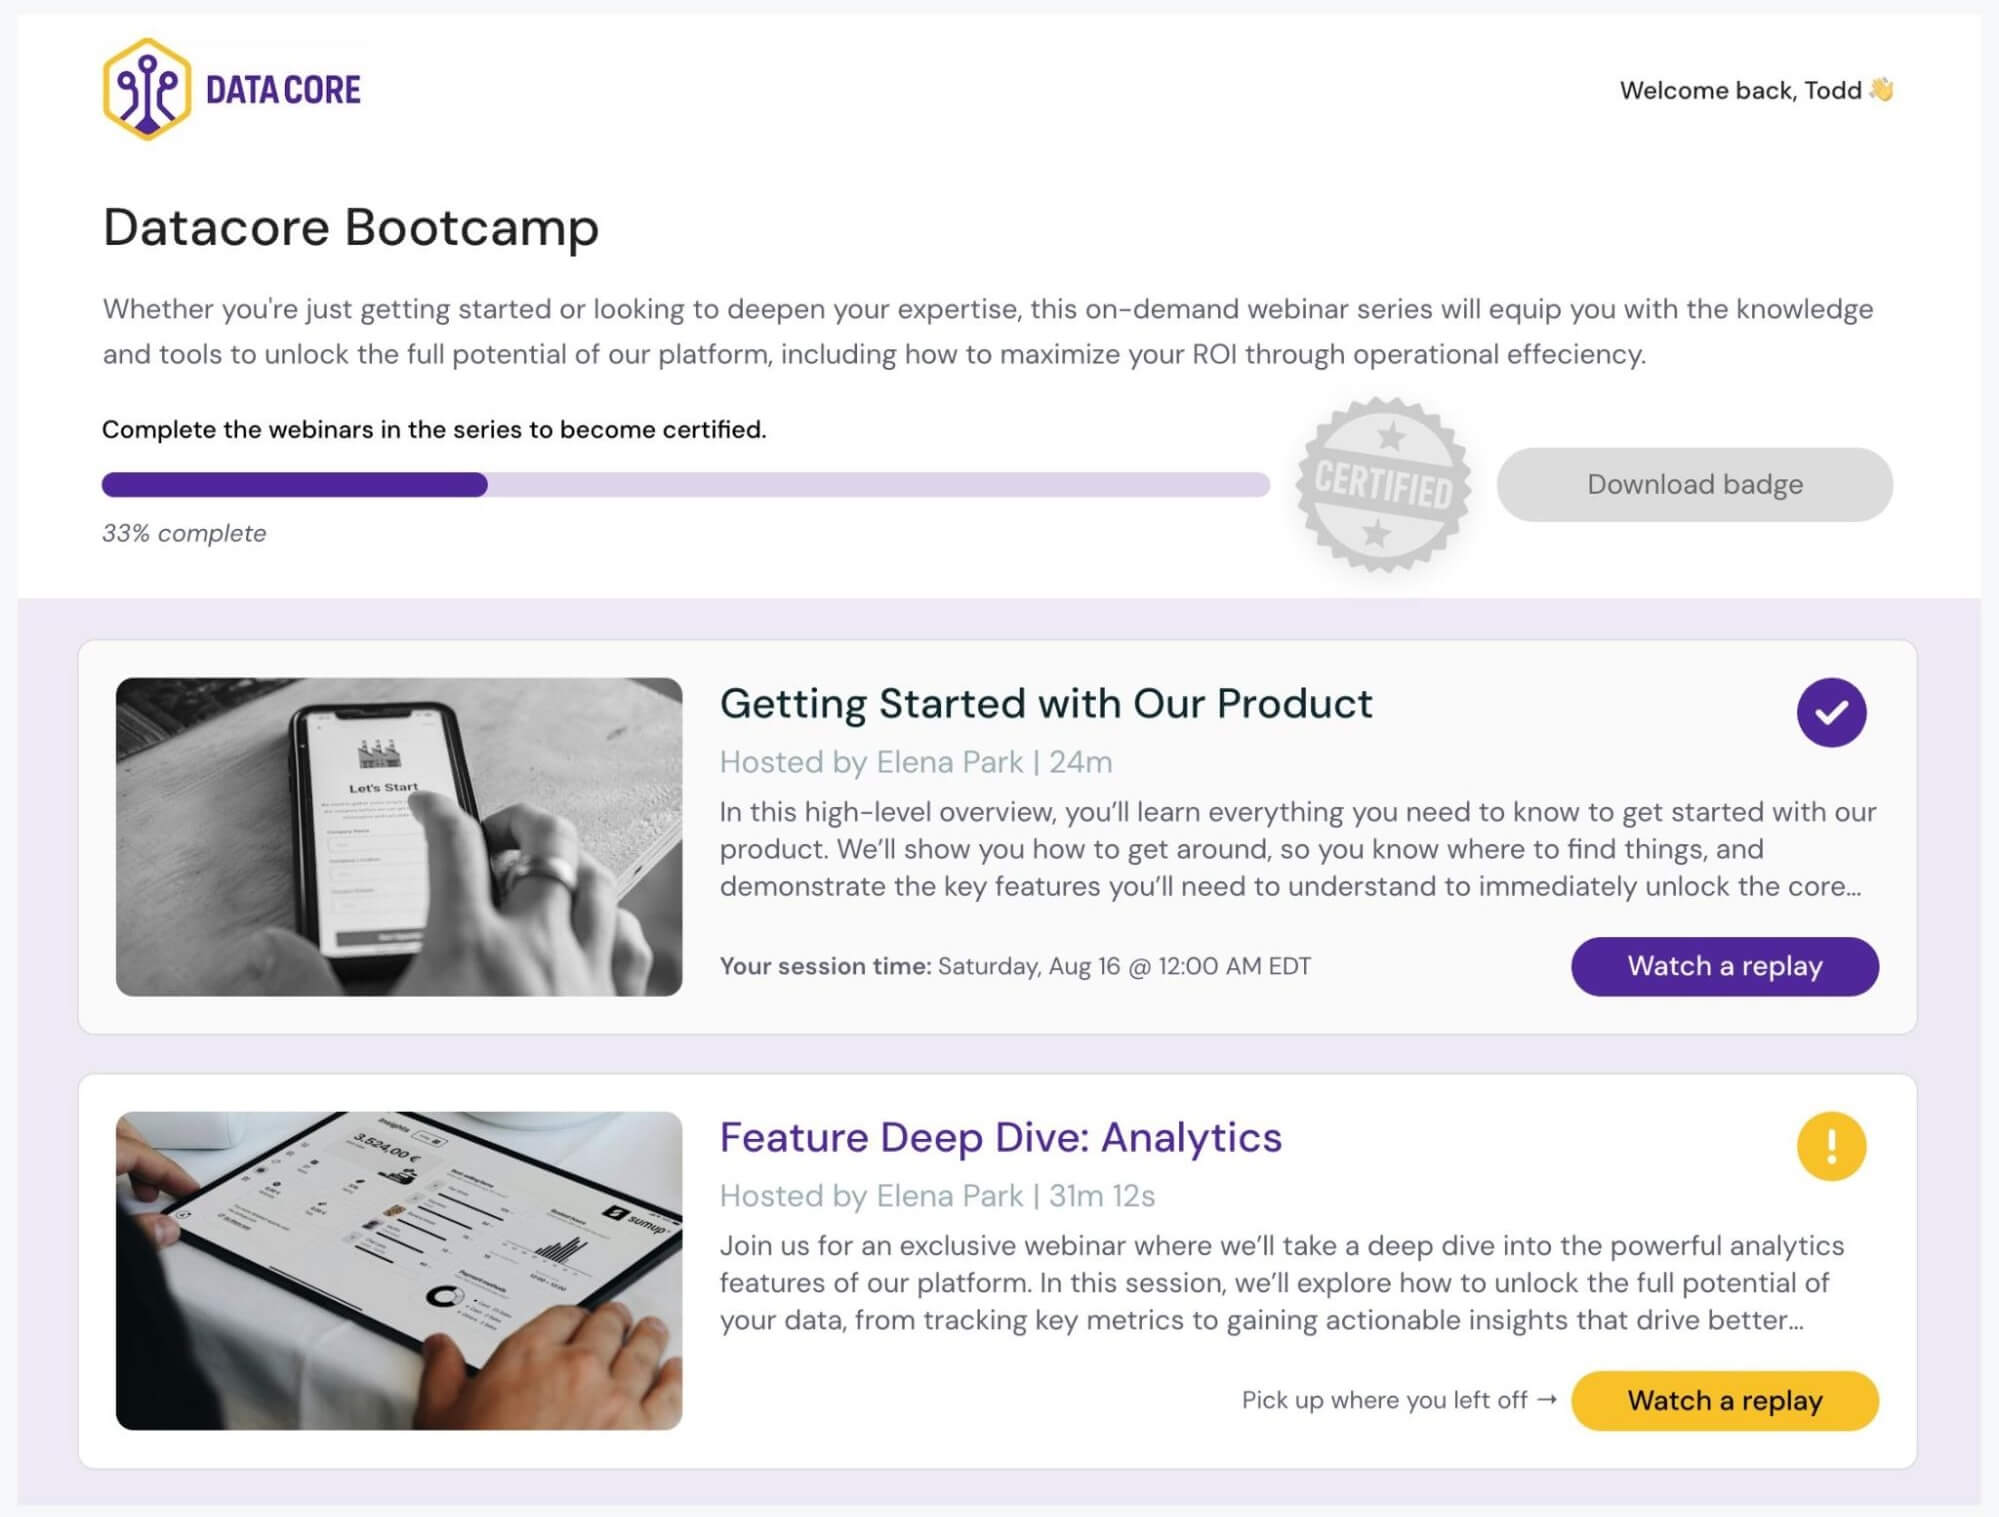
Users’ training pages serve as the command center or home base for their learning experience. They’re always directed here when entering the course, so they know exactly what to be working on.
Participants can chat directly with your team anytime they have questions during the course.
Our asynchronous chat supports real-time replies when someone on your team is available, but also lets you pick up conversations later if no one can respond immediately. When you reply later, those responses are automatically sent to participants' email addresses, so they don't miss anything.
Even more conveniently, all chat conversations are saved to each participant's training page, so they can always go back to check answers or reference important details.
This asynchronous chat is what really allows you to automate webinar courses. You don’t need somebody on your team watching chats around the clock. Moderators can view all chats in the central admin — regardless of when they’re sent or whether the webinar session is still running — and respond to participants when they’re available. They never miss a conversation or leave anybody hanging.
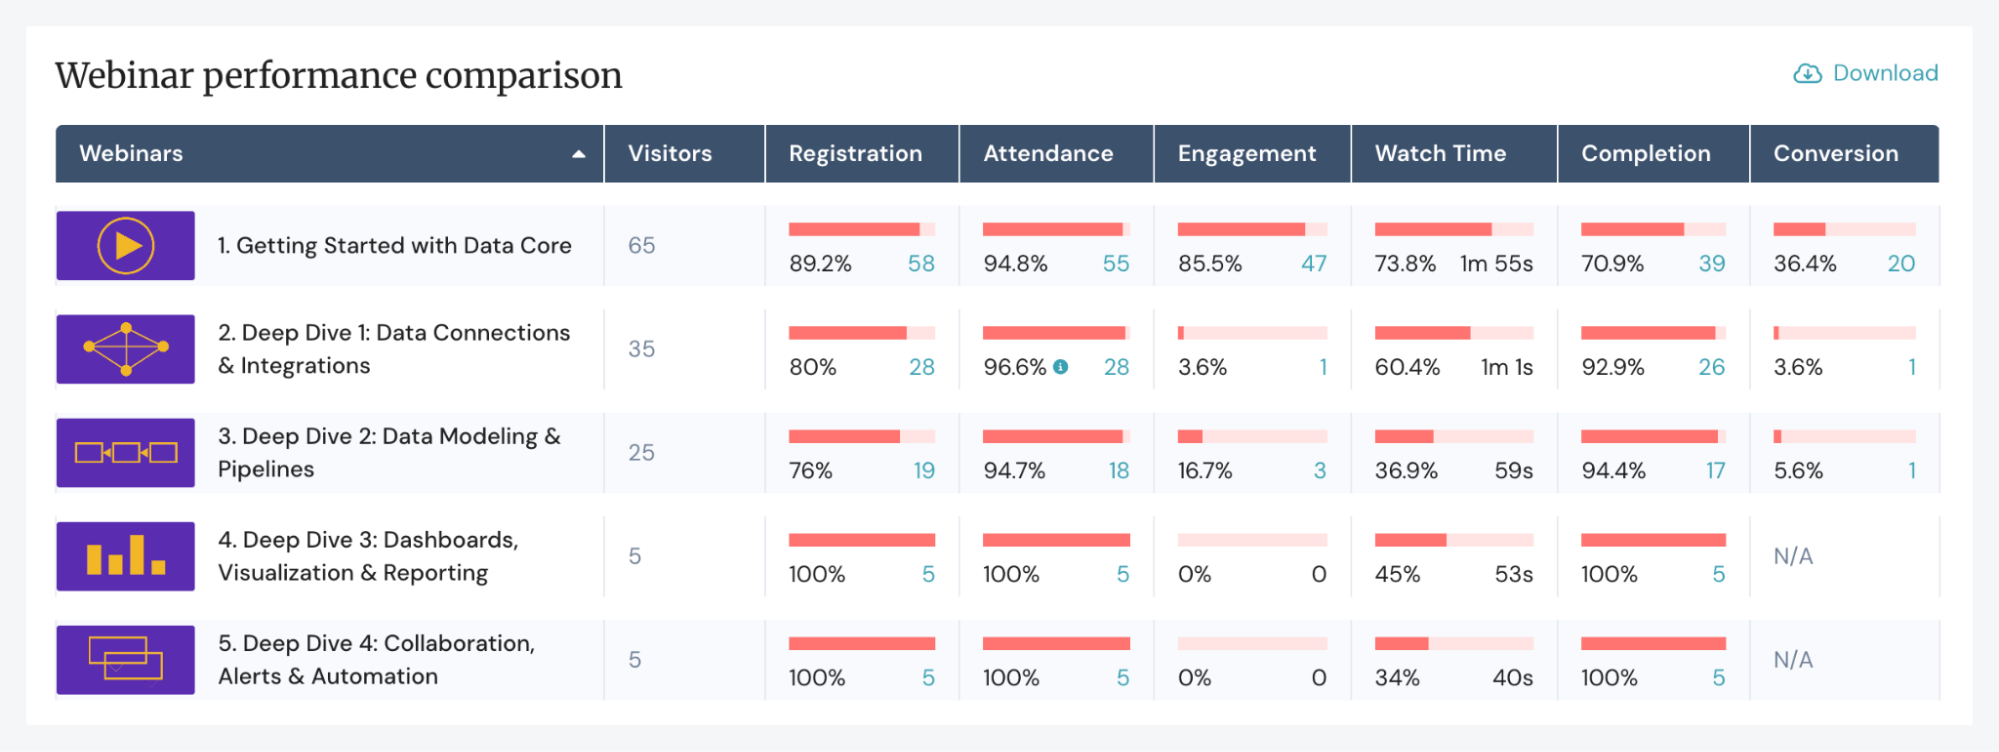
Each Webinar Series gets a dedicated analytics dashboard that tracks the performance of all lessons and shows you how your entire course is performing.
The Universal Dashboard provides a breakdown of:
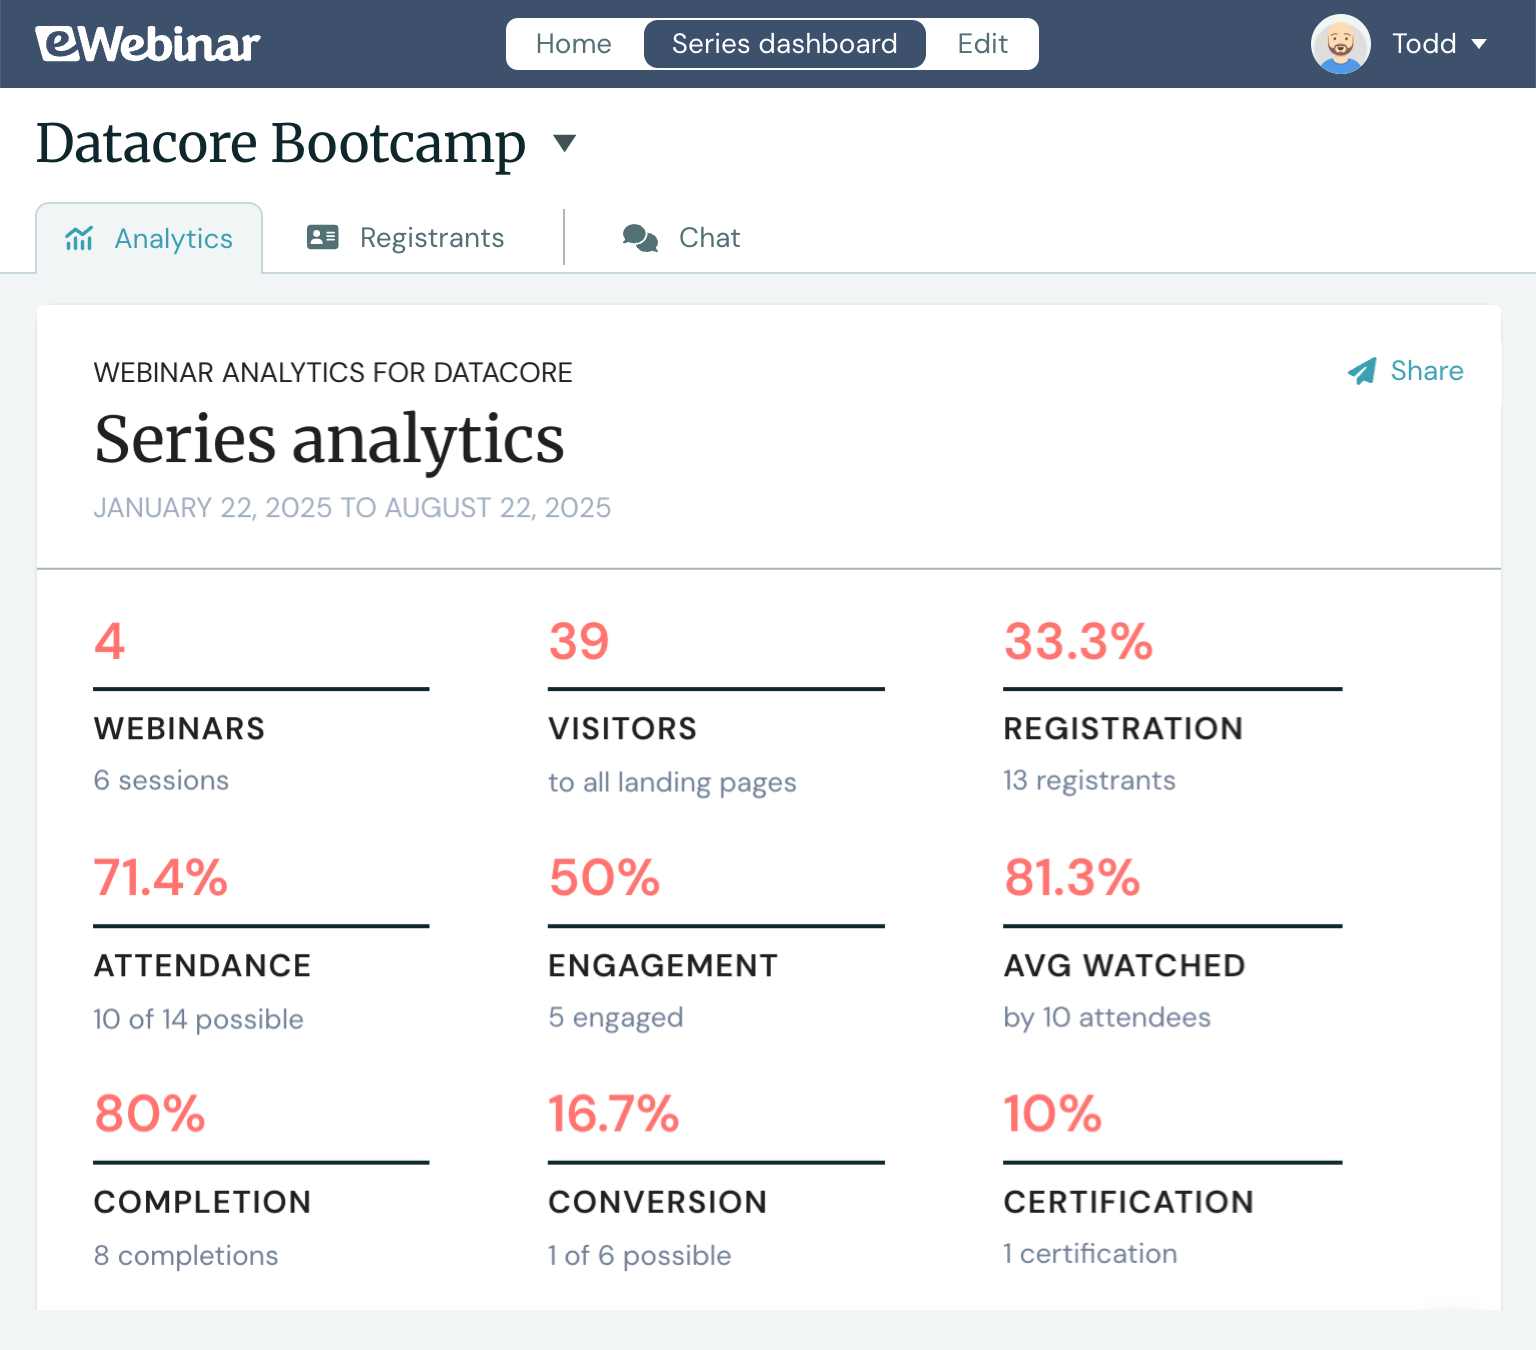
You can also compare the relative performance of different sessions to spot weak links in your course. See if people are dropping off mid-series, identify which lessons are most engaging, and view side-by-side session performance to understand where participants might be struggling.
Our system also lets you track individual participant journeys — see exactly how each person is moving through your course, which lessons they've completed, and where they might need additional support.
All of this data — cross-webinar analytics, individual session breakdowns, and participant tracking — lets you measure the effectiveness of your course, identify which lessons are working well (and which need improvement), and understand who your course is actually best suited for, so you can offer more successful webinar courses.
For example, if you see participants consistently dropping off during a particular lesson, you might need to rework that content to make it more engaging or break it into smaller, more digestible segments.
Or, if you notice beginner users consistently getting stuck around the middle or end of your course, that's a signal the material might be too advanced. You could then create a separate foundational course for beginners and position your current course for more experienced learners instead.
Webinar Series packs in everything you need to create, deliver, and manage professional webinar courses.
With webinar tools designed for both course providers and participants — from completion controls and detailed analytics on your end, to personalized training pages and chat for attendees — you can offer a seamless learning experience from start to finish.
Ready to begin building your webinar course? Start a 14-day free trial here!
For more details on our complete toolkit and how eWebinar supports all of your webinar initiatives, watch our demo below.
Commencez votre essai gratuit de 14 jours dès aujourd'hui !